「 Custom Field Template 」のインストール、設定、使用方法についての記事。
「 Custom Field Template 」は、カスタムフィールドの使い勝手を格段に向上させるWordPressプラグイン。
特徴
- 投稿画面にカスタムフィールドの便利な入力フォームが現れるので、カスタムフィールドを入力しやすくなる。
- 複数のテンプレートを設定しておけば、投稿画面で複数の入力フォームを選択できる。
- 予め複数の表示用テンプレートを作っておき、表示するときにテンプレートを指定してやれば、複数のテンプレートを使い分けることができる。
ダウンロード
配布サイト:Custom Field Template(英語サイト)
作者のサイト:Custom Field Template plugin
2011年01月11日現在のバージョン:Custom Field Template 1.79
2011年01月11日現在の必要なワードプレスのバージョン:WordPress 2.1 以上
zipファイルを解凍すると、「custom-field-template」というフォルダが出てくる。
インストール
「custom-field-template」フォルダを、フォルダごと、wp-content/plugins/ フォルダにアップロード・設置。
管理パネルで、「プラグイン」をクリックし、プラグイン設定画面を開く。「Custom Field Template」を探し有効化。
![]()
設定
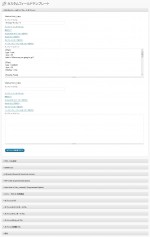
管理パネルで、「設定」メニュー内の「カスタムフィールドテンプレート」をクリックし、「カスタムフィールドテンプレート」の設定画面を開く。
 右の画像のように、設定項目がずらりと並んでいるが、「カスタムフィールドテンプレートオプション」と「 [cft] and [cftsearch] Shortcode Format 」を設定するだけでも、大概のことはできてしまうだろう。
カスタムフィールドテンプレートオプション
「TEMPLATE #0」には、下記のようなテンプレートが入力済みだ。
1 2 3 4 5 6 7 8 9 10 11 12 13 14 15 16 17 18 19 20 21 22 23 24 25 26 27 28 29 30 31 32 33 34 35 36 | [Plan] type = text size = 35 label = Where are you going to go? [Plan] type = textfield size = 35 hideKey = true [Favorite Fruits] type = checkbox value = apple # orange # banana # grape default = orange # grape [Miles Walked] type = radio value = 0-9 # 10-19 # 20+ default = 10-19 clearButton = true [Temper Level] type = select value = High # Medium # Low default = Low [Hidden Thought] type = textarea rows = 4 cols = 40 tinyMCE = true htmlEditor = true mediaButton = true [File Upload] type = file |
何を意味するかは、HTMLのフォームタグを知っていれば、想像がつく。
例えば、
1 2 | type = text size = 35 |
は、HTMLのフォームタグで書くなら、
1 | <input type="text" size="35"> |
であろう。
1 2 3 | type = checkbox value = apple # orange # banana # grape default = orange # grape |
は、HTMLのフォームタグで書くなら、
1 2 3 4 | <input type="checkbox" value="apple"> <input type="checkbox" value="orange" checked> <input type="checkbox" value="banana"> <input type="checkbox" value="grape" checked> |
であろう。
「type」には、
1 | text、textfield、checkbox、radio、select、textarea、file |
が、指定できるようだ。
[cft] and [cftsearch] Shortcode Format
![カスタムフィールドテンプレート - [cft] and [cftsearch] Shortcode Format custom-field-template-shortcode_format.png](http://alphasis.info/wp-content/uploads/2011/01/custom-field-template-shortcode_format-150x105.png) ここで、出力用フォーマットを設定しておけば、投稿記入欄に
ここで、出力用フォーマットを設定しておけば、投稿記入欄に
[cft format=0]
などを入力するだけで、カスタムフィールドの内容を表示できる。
「FORMAT #0」には、下記のようなフォーマットが入力済みだ。
1 2 3 4 5 6 7 8 9 10 11 12 13 14 15 16 17 | <table class="cft"> <tbody> <tr> <th>Plan</th><td colspan="3">[Plan]</td> </tr> <tr> <th>Favorite Fruits</th><td>[Favorite Fruits]</td> <th>Miles Walked</th><td>[Miles Walked]</td> </tr> <tr> <th>Temper Level</th><td colspan="3">[Temper Level]</td> </tr> <tr> <th>Hidden Thought</th><td colspan="3">[Hidden Thought]</td> </tr> </tbody> </table> |
[Plan]のように、”[“と”]”で囲まれている箇所が、カスタムフィールドの内容に置き換わる。
使い方
カスタムフィールドの内容を入力するには
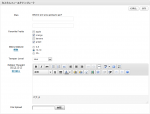
 投稿入力画面を開くと、右の画像のようなカスタムフィールドテンプレートというボックスが追加されている。
入力したら、保存ボタンをクリック。
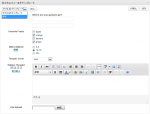
 複数のテンプレートを設定してある場合は、右の画像のように、選択して読み込める。
カスタムフィールドの内容を表示させるには
投稿入力欄に、[cft format=0]を入力。
![カスタムフィールドテンプレート - 表示 - [cft format=0] custom-field-template-display-example-shortcode_format-cft.jpg](http://alphasis.info/wp-content/uploads/2011/01/custom-field-template-display-example-shortcode_format-cft-150x56.jpg) 上記のデフォルトのテンプレートとフォーマットで表示すると、右の画像のように表示される。
上記のデフォルトのテンプレートとフォーマットで表示すると、右の画像のように表示される。
カスタムフィールド検索フォームを表示させるには
投稿入力欄に、[cftsearch format=0]を入力。
![カスタムフィールドテンプレート – 表示 – [cftsearch format=0] custom-field-template-display-example-shortcode_format-cftsearch.jpg](http://alphasis.info/wp-content/uploads/2011/01/custom-field-template-display-example-shortcode_format-cftsearch-150x111.jpg) 上記のデフォルトのテンプレートとフォーマットで表示すると、右の画像のような検索フォームが表示される。
上記のデフォルトのテンプレートとフォーマットで表示すると、右の画像のような検索フォームが表示される。
カスタムフィールド検索フォームの項目が多いときは、投稿ごとに表示するよりも、カスタムフィールド検索フォーム用のページを作っておくといいかも。
感想
カスタムフィールドの使い勝手が格段に向上する。入力フォームが現れるだけでも便利だが、複数のテンプレートを切り替えられたり、複数の表示フォームを設定しておけたり、とても優れものだ。
Custom Field Template で、音楽用カスタムフィールドを作る方法のページも参考になるかもしれない。