“ブラインド”フィルターは、画像をブラインド越しに見ているかのように、線を加える変形フィルター。
使い方によっては、走査線のような効果を演出できる。
ブラインドの線の色は、ツールボックス内の背景色が適用される。
“ブラインド”フィルターの使い方
メニューバーの「 フィルター > 変形 > ブラインド 」で、「 ブラインド 」ダイアログを開く。
「 ブラインド 」ダイアログ
- プレビュー
-
プレビューを有効にしておくと、ダイアログ上で、効果を確認しながら設定できる。
- 向き
-
ブラインドの線を、水平に描くか垂直に描くか選択。
- 背景
-
「透明」を有効にすると、ブラインドの線が透明になり、後ろのレイヤーが現れる。
- ずれ
-
この数値を増やすと、ブラインドの線の幅が大きくなる。
-
この数値を減らすと、ブラインドの線の幅が小さくなる。
-
「1~90」の範囲で設定。
- 区切りの数
-
ブラインドの線の数。
-
「1~100」の範囲で設定。
“ブラインド”フィルターによる生成例
元画像。
この画像に、”ブラインド”フィルターを適用すると、それぞれ下のようになる。
![GIMP - “ブラインド”フィルターによる生成例 - 初期設定値 gimp-filter-distort-blinds-ex-default.jpg](http://alphasis.info/wp-content/uploads/2011/01/gimp-filter-distort-blinds-ex-default-150x78.jpg)
向き:水平
背景-透明:無効
ずれ:30
区切りの数:3
![GIMP - “ブラインド”フィルターによる生成例 - 向き:垂直 gimp-filter-distort-blinds-ex-vertical.jpg](http://alphasis.info/wp-content/uploads/2011/01/gimp-filter-distort-blinds-ex-vertical-150x78.jpg)
![GIMP - “ブラインド”フィルターによる生成例 - 背景-透明:有効 gimp-filter-distort-blinds-ex-transparent.jpg](http://alphasis.info/wp-content/uploads/2011/01/gimp-filter-distort-blinds-ex-transparent-150x78.jpg)
![GIMP - “ブラインド”フィルターによる生成例 - ずれ:1 gimp-filter-distort-blinds-ex-displacement_1.jpg](http://alphasis.info/wp-content/uploads/2011/01/gimp-filter-distort-blinds-ex-displacement_1-150x78.jpg)
![GIMP - “ブラインド”フィルターによる生成例 - ずれ:90 gimp-filter-distort-blinds-ex-displacement_90.jpg](http://alphasis.info/wp-content/uploads/2011/01/gimp-filter-distort-blinds-ex-displacement_90-150x78.jpg)
![GIMP - “ブラインド”フィルターによる生成例 - ずれ:45 gimp-filter-distort-blinds-ex-displacement_45.jpg](http://alphasis.info/wp-content/uploads/2011/01/gimp-filter-distort-blinds-ex-displacement_45-150x78.jpg)
![GIMP - “ブラインド”フィルターによる生成例 - 区切りの数:1 gimp-filter-distort-blinds-ex-number_of_segments_1.jpg](http://alphasis.info/wp-content/uploads/2011/01/gimp-filter-distort-blinds-ex-number_of_segments_1-150x78.jpg)
![GIMP - “ブラインド”フィルターによる生成例 - ずれ:90 - 区切りの数:65 gimp-filter-distort-blinds-ex-displacement_90-displacement_65.jpg](http://alphasis.info/wp-content/uploads/2011/01/gimp-filter-distort-blinds-ex-displacement_90-displacement_65-150x78.jpg)
区切りの数:65
![GIMP - “ブラインド”フィルターによる生成例 - ずれ:1 - 区切りの数:39 gimp-filter-distort-blinds-ex-displacement_1-displacement_39.jpg](http://alphasis.info/wp-content/uploads/2011/01/gimp-filter-distort-blinds-ex-displacement_1-displacement_39-150x78.jpg)
区切りの数:39
![GIMP - “ブラインド”フィルターによる生成例 - ずれ:1 - 区切りの数:39 - 背景色:d8ff00 gimp-filter-distort-blinds-ex-displacement_1-displacement_39-d8ff00.jpg](http://alphasis.info/wp-content/uploads/2011/01/gimp-filter-distort-blinds-ex-displacement_1-displacement_39-d8ff00-150x78.jpg)
区切りの数:39
背景色:d8ff00
“ブラインド”フィルターの利用例
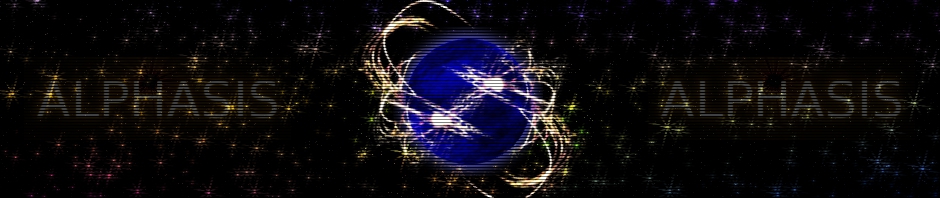
“ブラインド”フィルターを、走査線風に使ってみた。
炎 | 紅炎(プロミネンス)を描く下塗りフィルター | GIMPで作成した画像の上に、新しいレイヤーを作り、「ずれ:1/区切りの数:66」で、”ブラインド”フィルターを使用し、レイヤーのモードを「微粒取り出し」にした。