「新聞印刷フィルタ」などを使い、細かいグリッド風背景を簡単に描く方法。
新しい画像を作成
![gimp-tutorial-fineGridBackground-file-new](http://alphasis.info/wp-content/uploads/2014/11/gimp-tutorial-fineGridBackground-file-new-300x290.png)
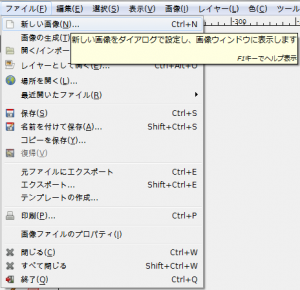
「ファイル⇒新しい画像」で、「新しい画像を作成」ダイアログを開く。
![gimp-tutorial-fineGridBackground-file-new-dialog](http://alphasis.info/wp-content/uploads/2014/11/gimp-tutorial-fineGridBackground-file-new-dialog-300x335.png)
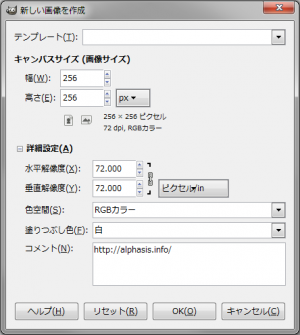
「高さ:256px」、「幅:256px」、「塗りつぶし色:白」の画像を新規作成。
新しいレイヤーを追加
![gimp-tutorial-fineGridBackground-layer-newLayer](http://alphasis.info/wp-content/uploads/2014/11/gimp-tutorial-fineGridBackground-layer-newLayer-300x335.png)
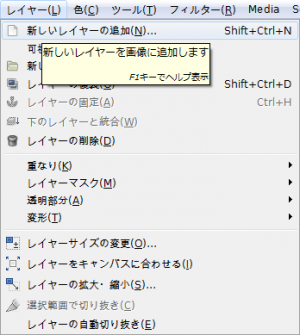
「レイヤー⇒新しいレイヤーの追加」で、「新しいレイヤー」ダイアログを開く。
![gimp-tutorial-fineGridBackground-layer-new-dialog](http://alphasis.info/wp-content/uploads/2014/11/gimp-tutorial-fineGridBackground-layer-new-dialog-300x327.png)
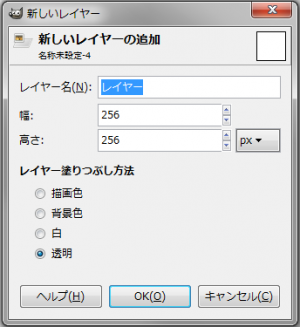
「高さ:256px」、「幅:256px」、「レイヤー塗りつぶし方法:透明」の新しいレイヤーを追加。
薄いピンク色に塗りつぶす
![gimp-tutorial-fineGridBackground-color-ffd3f8](http://alphasis.info/wp-content/uploads/2014/11/gimp-tutorial-fineGridBackground-color-ffd3f8.png)
「描画色」を薄いピンク色「ffd3f8」に設定する。
![gimp-tutorial-fineGridBackground-edit-fill-fg-ffd3f8](http://alphasis.info/wp-content/uploads/2014/11/gimp-tutorial-fineGridBackground-edit-fill-fg-ffd3f8-300x470.png)
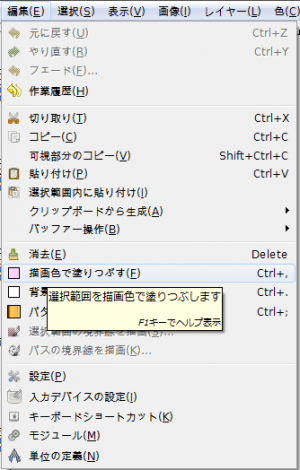
「フィルタ⇒編集⇒描画色で塗りつぶす」で、薄いピンク色に塗りつぶす。
![gimp-tutorial-fineGridBackground-ex-1](http://alphasis.info/wp-content/uploads/2014/11/gimp-tutorial-fineGridBackground-ex-1.png)
右の画像のようになる。
新聞印刷
![gimp-tutorial-fineGridBackground-filter-distort-newsprint](http://alphasis.info/wp-content/uploads/2014/11/gimp-tutorial-fineGridBackground-filter-distort-newsprint-300x215.jpg)
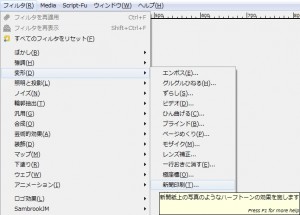
「フィルタ⇒変形⇒新聞印刷」で、「新聞印刷」ダイアログを開く。
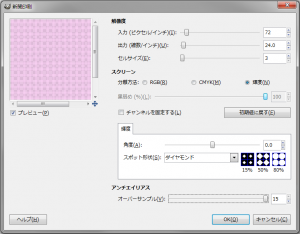
![gimp-tutorial-fineGridBackground-filter-distort-newsprint-dialog](http://alphasis.info/wp-content/uploads/2014/11/gimp-tutorial-fineGridBackground-filter-distort-newsprint-dialog-300x234.png)
下記の設定で適用。
- セルサイズ:3
- スクリーン:輝度
- 角度:45.0
- スポット形状:ダイアモンド
- オーバーサンプル:15
![gimp-tutorial-fineGridBackground-ex-2](http://alphasis.info/wp-content/uploads/2014/11/gimp-tutorial-fineGridBackground-ex-2.png)
右の画像のようになる。
シームレス化
![gimp-tutorial-fineGridBackground-ex--filters-map-makeSeamless](http://alphasis.info/wp-content/uploads/2014/11/gimp-tutorial-fineGridBackground-ex-filters-map-makeSeamless-300x212.png)
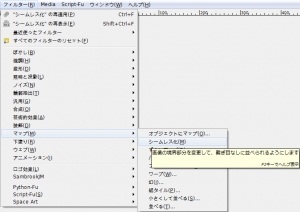
「フィルタ⇒マップ⇒シームレス化」で、シームレス化しておけば、並べても繋ぎ目のわからないシームレスなタイル画像になる。
![gimp-tutorial-fineGridBackground-ex-3](http://alphasis.info/wp-content/uploads/2014/11/gimp-tutorial-fineGridBackground-ex-3.png)
右の画像のようになれば完成。
使用例
![gimp-tutorial-fineGridBackground-ex-header](http://alphasis.info/wp-content/uploads/2014/11/gimp-tutorial-fineGridBackground-ex-header-300x63.png)
ヘッダーの背景に使用。